TABLE OF CONTENTS
- Overview
- Accessing Drivers Page
- Log in to the Azuga Fleet web platform.
- Drivers Page Overview
- Driver Detailed View
- Add Driver Workflow
Overview
The revamped Drivers Admin page provide a streamlined and centralized way to manage people and access within the Azuga web platform. With an improved layout and simplified workflows, administrators can quickly create, search, edit, and manage both driver and portal user records with greater efficiency and visibility.
These updates introduce a cleaner interface, faster filtering and search capabilities, and more structured data entry forms, making day-to-day administration easier and more consistent.
This guide explains how to navigate and use the updated Drivers and Users Admin pages effectively.
Accessing Drivers Page
Log in to the Azuga Fleet web platform.
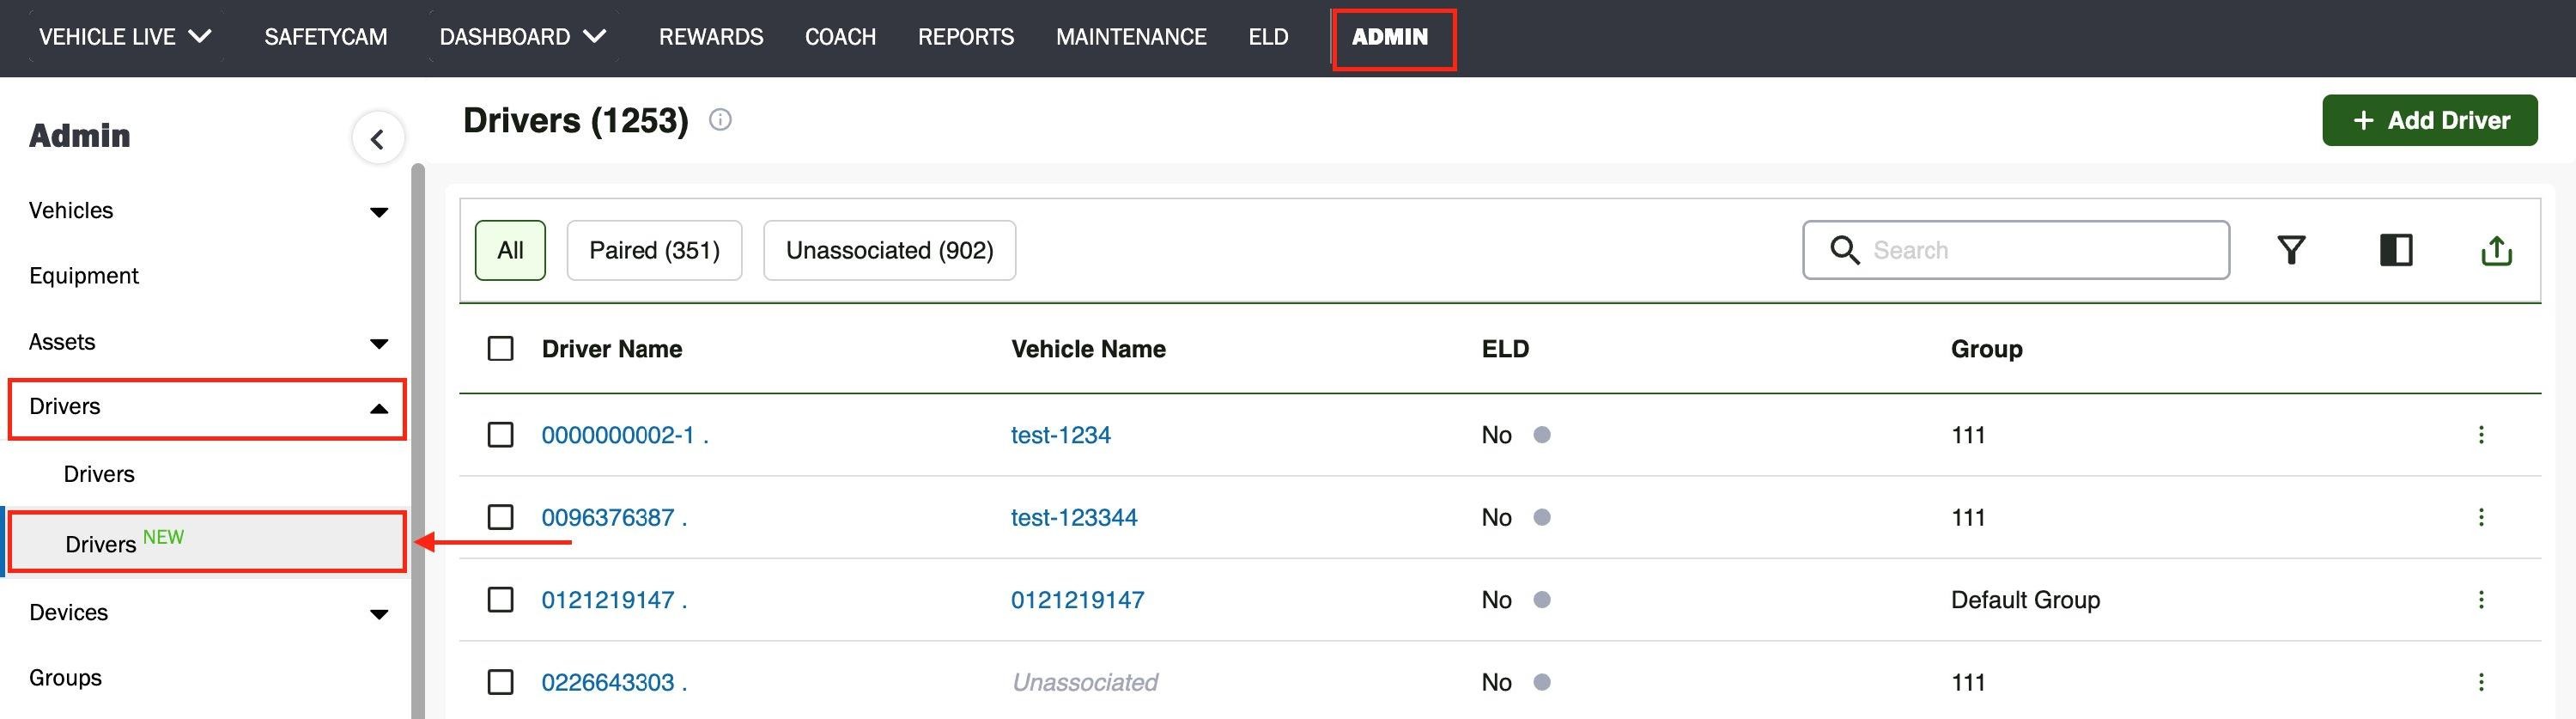
- Navigate to Admin >> Drivers >> Drivers(New).
Drivers Page Overview
The Drivers page displays all drivers with their vehicle association and ELD status.
At the top of the page, administrators can view:
- Total driver count
- Association filters (All/ Paired / Unassociated)
- Search and filter options

Note: For more features, refer to Additional table features
Table Fields:
The Drivers Table includes multiple available columns that can be configured based on user needs. By default, the Driver Name, Vehicle Name, ELD, and Group columns are enabled, while other columns can be turned on as required. Each column provides specific information about the driver, compliance, qualifications, and employment details. Below are all available columns with a short explanation for easy reference.
Driver Name – Displays the name of the driver configured in the system.
Vehicle Name – Shows the vehicle currently associated with the driver.
ELD – Indicates whether the driver is enabled as an ELD driver (Yes/No).
Group – The group to which the driver is assigned.
Age – Displays the driver’s age based on the recorded date of birth.
Blood Group – Shows the driver’s blood group if configured.
Date of Birth – The driver’s date of birth.
DDC – Driver Due Compliance or certification tracking field (if enabled).
Email – Driver’s registered email address.
Employee Id – Internal employee identifier for the driver.
Date of Joining – The date the driver joined the organization.
License Expiration – Driver license expiration date.
License Date – License issue date.
License State – State that issued the driver’s license.
License – Driver license number.
Location – Driver’s assigned or last known location (if configured).
Medical Test – Indicates medical certification status (Pass/Fail).
Phone – Driver’s contact phone number.
Police Verification – Shows police verification status if recorded.
Date of Resignation – Driver resignation or exit date, if applicable.
Safety Trainings – Safety training details or completion status.
Status – Current driver status (Active/Inactive or configured status).
Time Zone – Driver’s assigned time zone.
Total Experience – Total driving or work experience recorded for the driver.
Driver Detailed View
To see full details about a driver, simply click on any driver row in the Drivers list. This opens a detailed side panel where you can quickly review all driver related information in one place.
At the top, you’ll see the driver’s basic identity details such as name, role, and profile image. From here, you can also directly edit the driver record using the Edit button or open the more options menu (⋮) for additional actions(Provides the option to delete the driver).
The page is organized into clear sections to make information easy to scan:
- Overview — Shows key employer and profile details like joining date, experience, and identifiers
- Personal Information — Displays contact details, username, time zone, and personal data
- License Details — Contains license number, issue date, expiration date,and issuing state
- Compliance — Shows status fields such as medical test, DDC, safety training, and verification info
Each section can be expanded or collapsed, so you can focus only on what you need without clutter.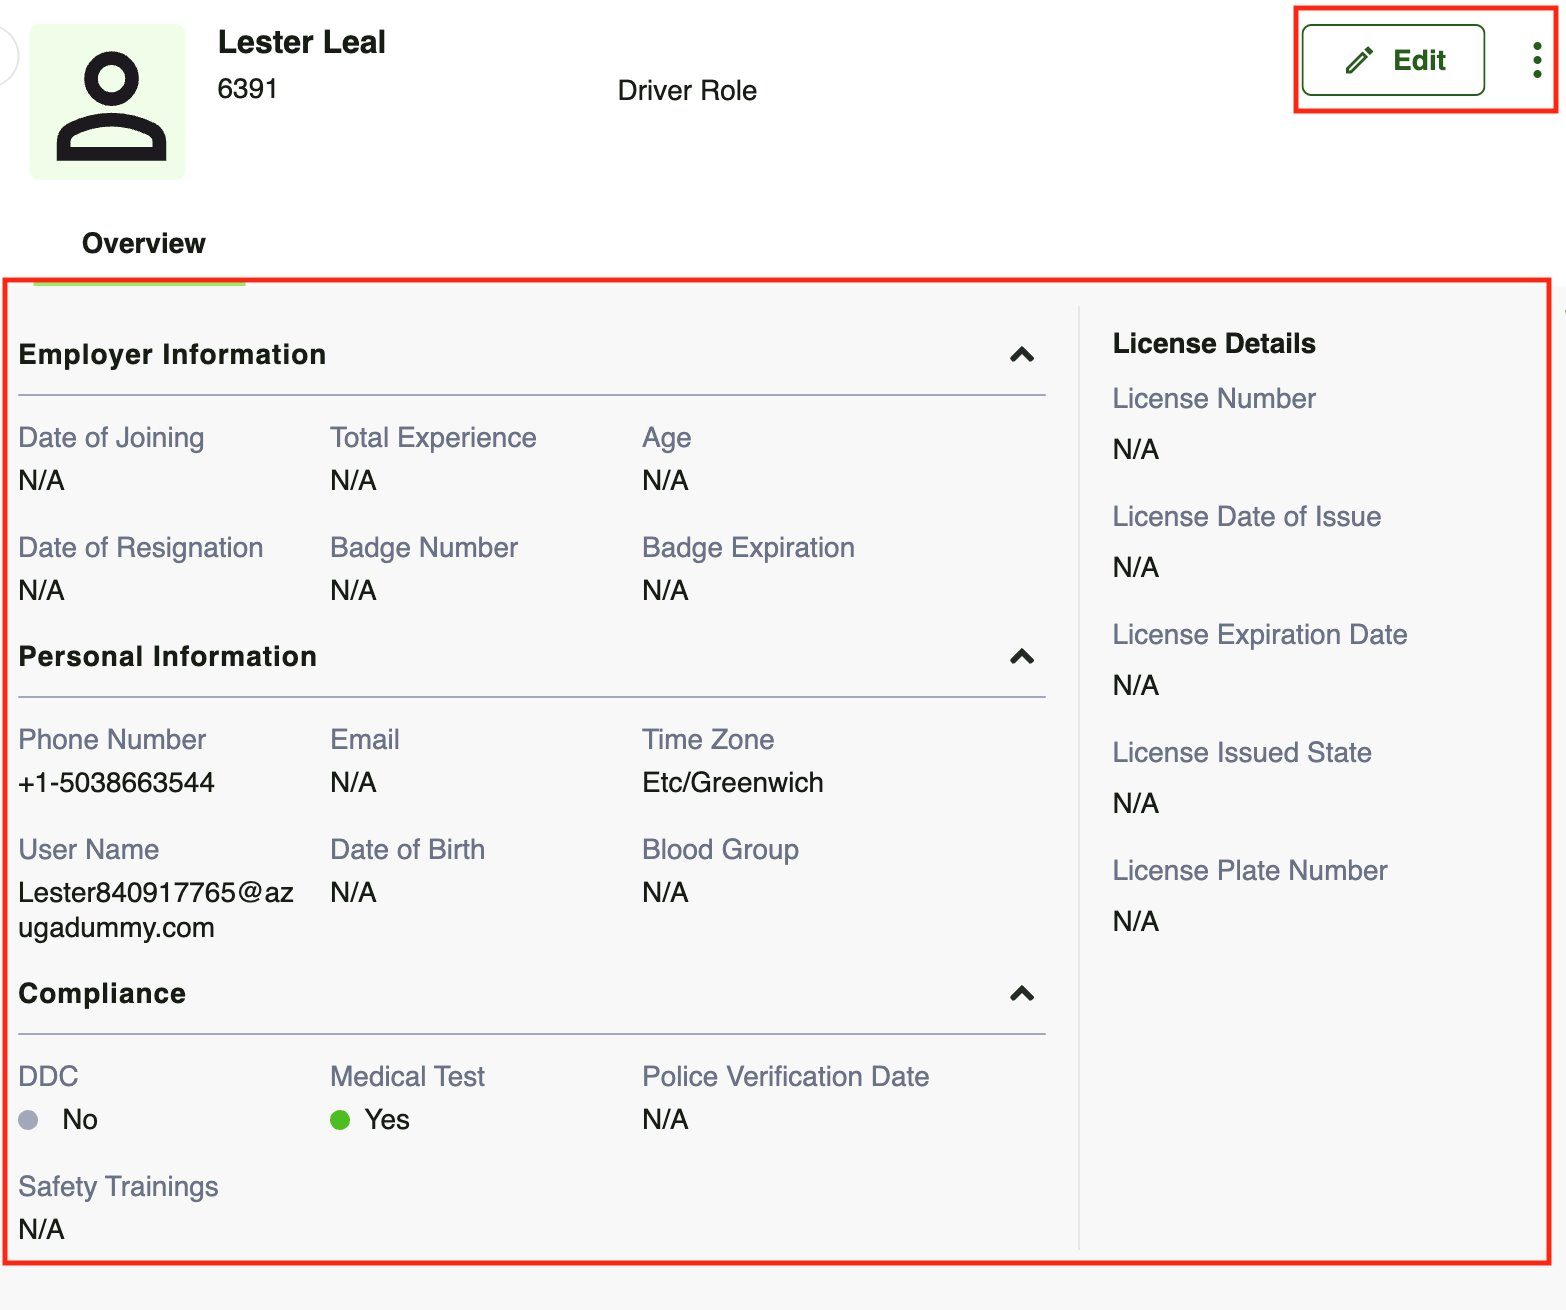
Add Driver Workflow
The Add New Driver page allows administrators to create and register a new driver in the system by entering personal, license, compliance, and employment details in one place.You can also associate vehicles, define driver roles, and upload supporting documents during creation.
Steps:
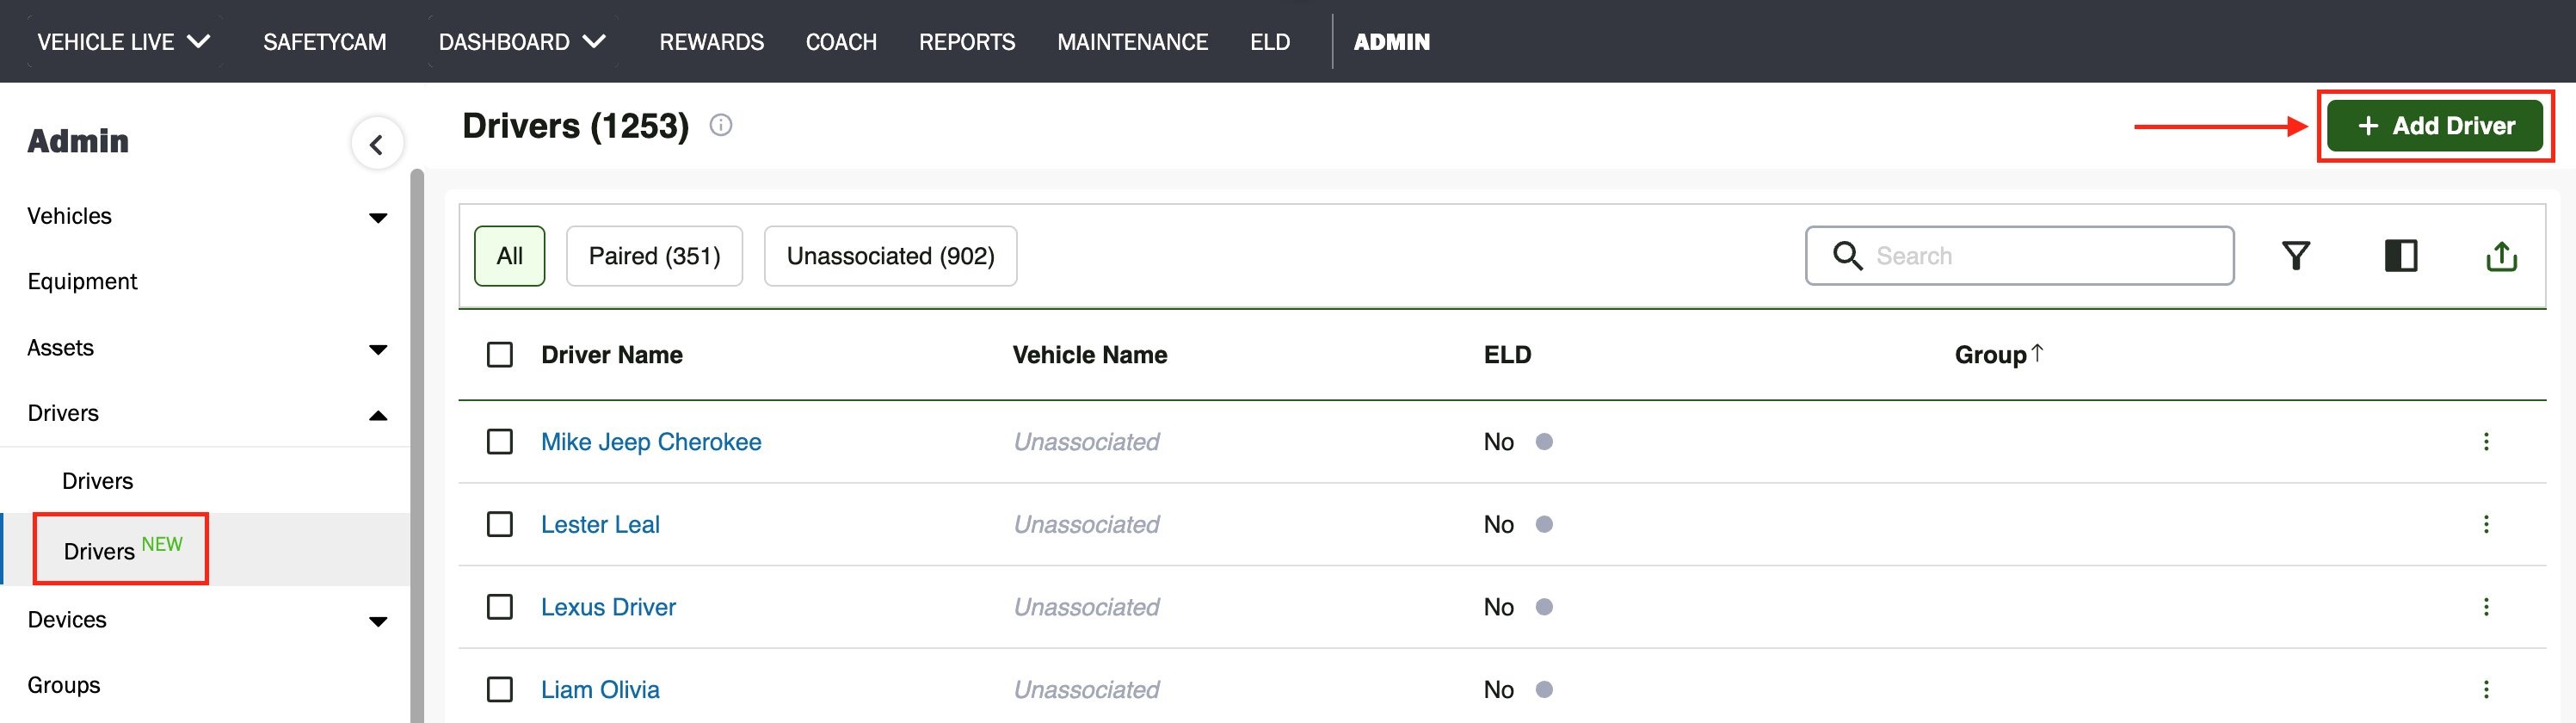
- Click + Add Driver.
- Enter the required driver details in each section
- Assign role, time zone, and associated vehicles
- Add license and compliance information (if available)
- Upload supporting documents if needed
- Click Save to create the driver record
- You can click Cancel anytime to discard changes.
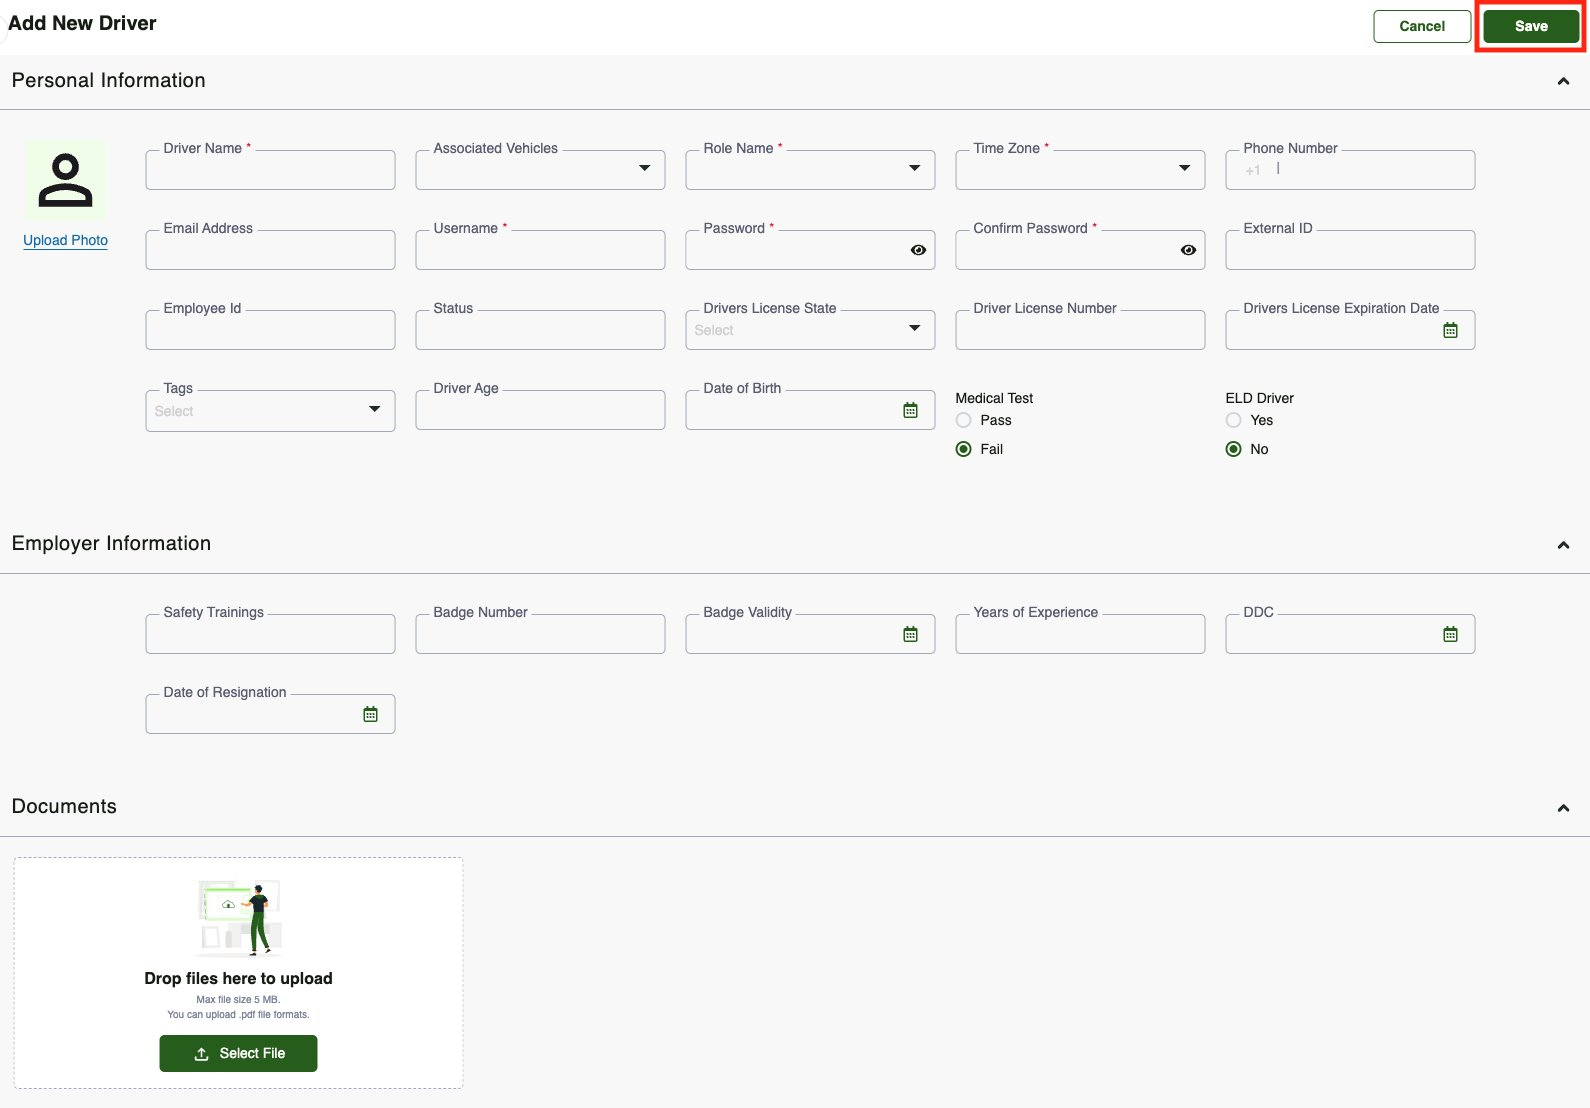
Enter the available driver details below to create a new driver record. Mandatory fields are marked in the form.
Driver Details
Driver Name – Enter the full name of the driver.
Associated Vehicles – Select and link one or more vehicles to the driver.
Role Name – Choose the driver role/profile from the dropdown.
Time Zone – Select the driver’s operating time zone.
Phone Number – Enter the driver’s contact number.
Email Address – Provide the driver’s email ID.
Username – Set the login username for the driver.
Password – Create a login password.
Confirm Password – Re-enter the password for confirmation.
External ID – Enter an external reference ID if used by your organization.
Employee ID – Enter the internal employee identifier.
Status – Set the driver’s active/inactive status.
Tags – Add tags for grouping or classification.
Driver Age – Enter the driver’s age.
Date of Birth – Select the driver’s birth date.
Driver License State – Select the issuing state of the license.
Driver License Number – Enter the license number.
Driver License Expiration Date – Select the license expiry date.
Medical Test – Mark medical test result (Pass/Fail).
ELD Driver – Indicate whether the driver is an ELD driver (Yes/No).
Upload Photo – Add a driver profile photo.
Employer Information Fields
Safety Trainings – Enter completed safety training details.
Badge Number – Enter the assigned badge number.
Badge Validity – Select badge expiration date.
Years of Experience – Enter total driving experience.
DDC – Enter DDC details/date if applicable.
Date of Resignation – Provide resignation date if the driver is inactive.
Documents
Documents – Upload driver-related documents (licenses, certificates, verification files).
TABLE OF CONTENTS
Was this article helpful?
That’s Great!
Thank you for your feedback
Sorry! We couldn't be helpful
Thank you for your feedback
Feedback sent
We appreciate your effort and will try to fix the article